In this article
The short answer
Import your GPX file and export a video
A GPX file contains locations from a recording or planned route. Save the route as GPX in the app or service that holds it, and have the .gpx file available in Files on your iPhone before opening the TrailVid beta. Several files can describe one trip.
Get the iPhone app
Add the GPX files
Tap the trip name to open the trip library. Choose Import, then GPX files, and tap Add GPX files. Select the files for this trip and check the list for any file that could not be read.
Scan the route
Tap Scan. TrailVid reads the files you added and proposes places from their locations, recording start and end points, waypoints, and any available times.
Review the places and lines
Enter a Trip name. Keep meaningful departures, arrivals, and visits. Exclude recording start or end points that do not mark a visit, then inspect each line between kept places, including whether it says recorded. Keep at least two stops and tap Create trip.
Check the route and choose a look
In the trip builder, check the stop order and tap the transport rows to correct how you travelled. Changing transport keeps any recorded line between those places. To change the appearance of the map and lettering, open Style, then Theme. In Scene, select Journey under Direction to have the camera follow the route.
Preview and export
Press Play and watch the path as well as the arrivals. Open Export video, choose Aspect ratio, Resolution, and Framerate, then tap Start export. Review the finished result and tap Save to Photos or Share….
The finished map video is silent and carries the TrailVid badge. Add footage and sound in your video editor. If the map needs to fit a vertical post, choose 9:16 and check the framing before the final export.
Continue with the finished route
Treat the recording as raw material
Check whether the file includes times as well as locations. A recording can reveal long stays and likely movement; a planned route may contain the line without reliable visit times. Those differences affect which dates and stops you can use in the film.
- Places answer where the story pauses.
- Recorded lines answer how the journey moved.
- Timestamps provide evidence for dates and stays.
- Gaps reveal where the file cannot describe one continuous route.
Keep visits and skip recording breaks
We made a sample GPX file for this guide, with pauses and gaps to demonstrate the import review. It contains nine track sections and produces seven proposed places around Frankfurt and Heidelberg. Frankfurt am Main has a pause of about 6.5 hours. Heidelberg has a pause of about 8.5 hours. Review those longer stays as possible visits to include.
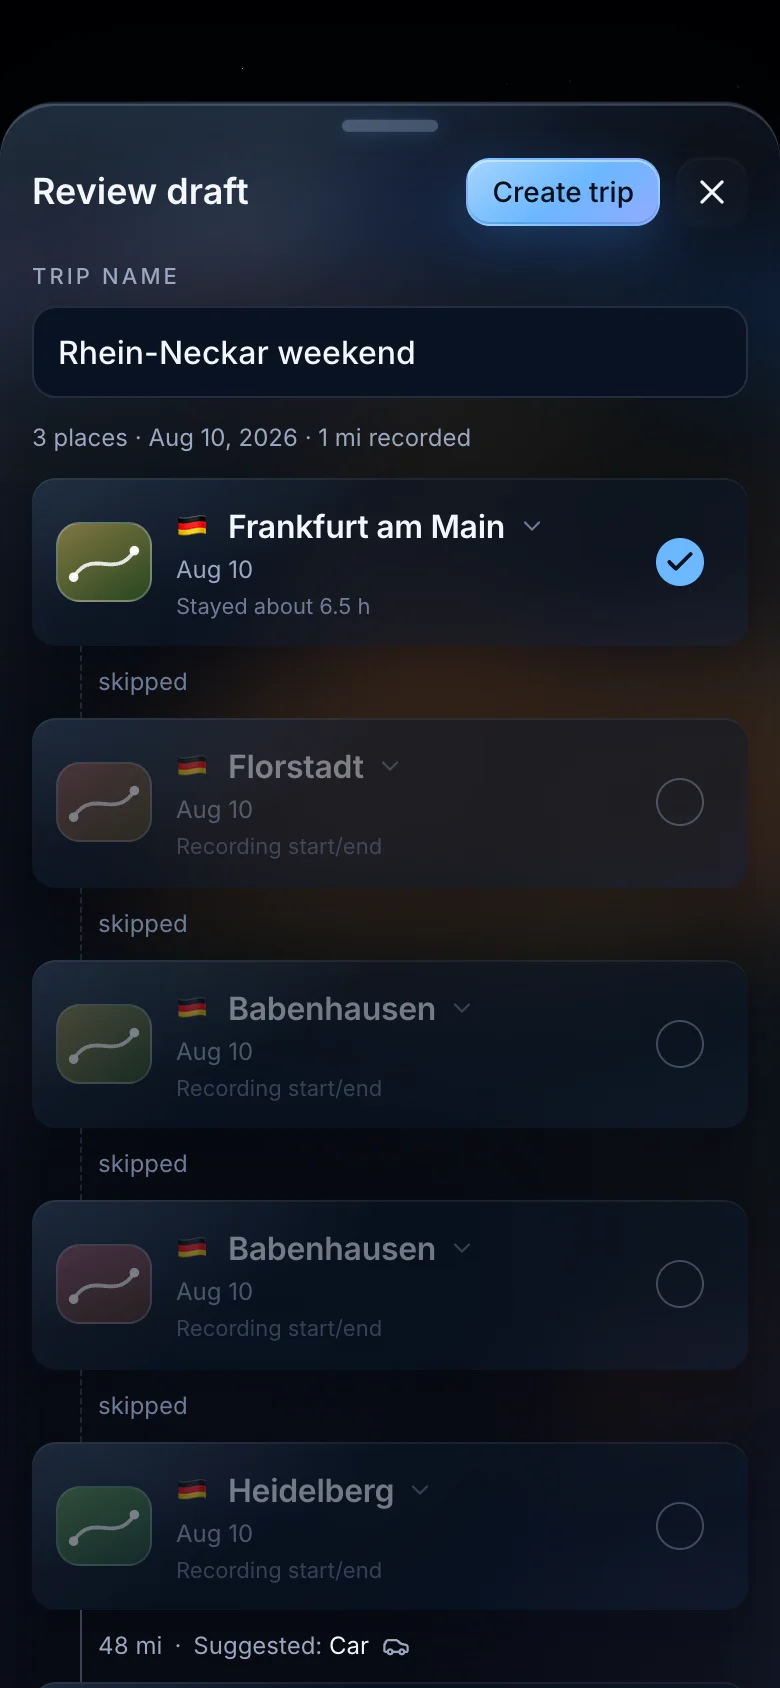
Four dimmed rows come from recording boundaries: Florstadt, two Babenhausen points, and an early Heidelberg point. The Babenhausen pair is one minute and roughly 0.44 km apart. Unless that minute contains an event the viewer needs, keep those recording fragments out of the arrival sequence.
The final Heidelberg point begins included because it is where the recording ends. Keep it if a walk to the station, hotel, or viewpoint closes the story. Exclude it when the longer Heidelberg stay already provides the ending.
Read the evidence beneath the place name
Stayed about…
Ask what happened during that time. An overnight stay, hike, visit, or reunion can earn a scene. A parked phone may only establish a boundary.
Recording start/end
The file begins or ends there. Keep the place only when that boundary matches a real departure, arrival, or change of chapter.
Waypoint from your file
A named marker may identify a summit or campsite. It can also be a utility point such as a junction or fuel stop. Decide from the trip, not the label alone.
Check the line after every exclusion
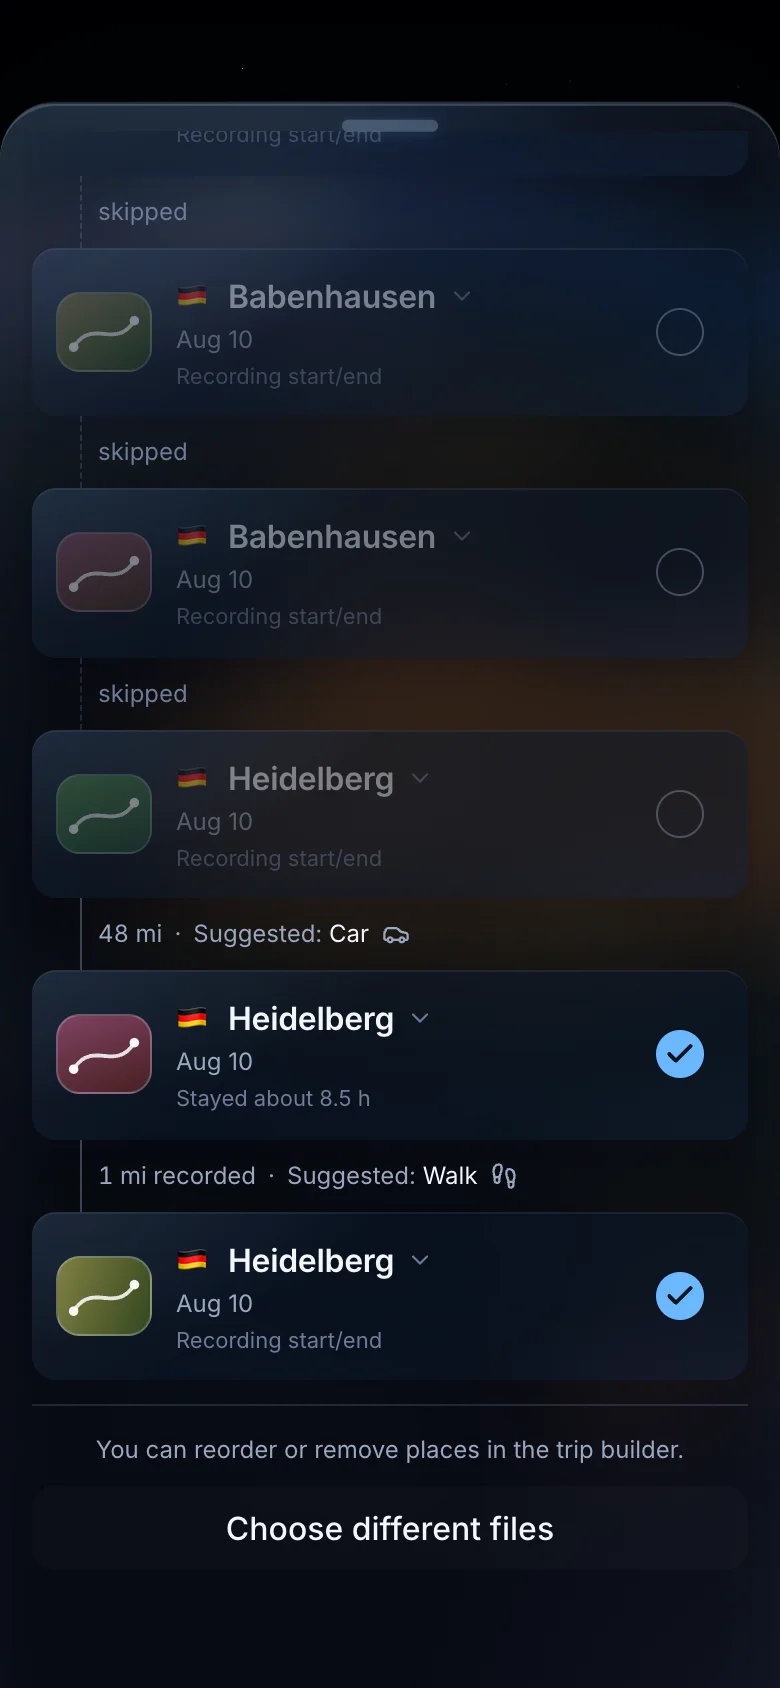
With the incidental recording endpoints excluded, the example produces two different lines. Frankfurt to the main Heidelberg stay reads about 78 km with a car suggestion and no recorded label. The file contains a drive out of Frankfurt, but gaps break the recording before Heidelberg, so TrailVid does not stretch that fragment across the missing distance.
The final Heidelberg leg reads about 2 km recorded with a walking suggestion. That section is continuous in the file, so the finished route can retain its recorded line. The mode is still a suggestion. Check it against what happened, then correct it in the trip builder after creating the trip.
Review the stops and route together
- Can I name what happened at this place?
- Did a stay, waypoint, or recording boundary create the row?
- Do nearby rows describe the same moment?
- Does the final recorded point make a useful opening or ending?
- After an exclusion, does the next line still say recorded?
- Does the suggested transport match what actually happened?
Create the trip after checking the included stops and their connecting lines. The result is an editable itinerary for a video. This workflow does not repair or export a cleaned GPX file.
This finished example keeps Frankfurt, the main Heidelberg stay, and the final Heidelberg point. Watch the computed drive arrive in Heidelberg, then the recorded walking line carry the journey to its last stop. The places and walking line come from the sample GPX file reviewed above.
Questions
Common questions
What GPX files work for a travel map video?
Recorded tracks and planned routes can both work. A recording can supply dates and pauses, while a planned route may supply only the line.
Will the video follow my exact GPX line?
An imported recording can draw the route between two stops when its points cover that connection. Gaps in the recording use the route available for the selected transport mode.
Can TrailVid import KML files?
No. TrailVid currently imports GPX files and does not support KML or map-link import.
Does changing the transport mode erase a recorded route?
No. Changing transport keeps the recorded line. To use a computed route instead, find Recorded track on that connection, tap its × button (Remove recorded track), and confirm Remove. Preview the new route before exporting; re-import the file if you need to recover the recording.